The Nixie Alarm: A Cheap, Easy, Open-Source Perimeter Alarm
- Nixieworks
- Jul 4, 2025
- 7 min read
DISCLAIMER: this article is for entertainment purposes only. The Nixie Alarm is a noise making device only, that uses novelty fireworks not regulated under the Michigan Fireworks Safety Act. Any modification of the Nixie Alarm not explicitly described here may be unsafe and is not recommended. Proceed at your own risk.
WHY ARE PERIMETER ALARMS IMPORTANT?
In the prepared citizen context, manpower is one of our biggest shortcomings. We don't have an entire company of guys to pull security 24/7. We have ourselves and a few buddies/loved ones, who are often busy doing other things. That's why it's important to use force multipliers when maintaining security. Any gear or technique that can help one person cover more area, or devote less attention to it, is a huge help. This is why things like perimeter alarms are so valuable.
For years, there's been a few types of perimeter alarms out there:
12 gauge / 209 primer / 22cal alarm. Dependable, but high per unit cost
Basic PIR motion sensors from the hardware store. Usually need grid power, not rugged, hard to deploy quickly
Off grid, rugged PIR motion sensors like Dakota Alert. Better, but still need power and a radio, VERY high per unit cost
Military Unattended Ground Sensors (UGS) cool, but completely out of reach for civilians

The per unit cost is one of my biggest complaints with these things. If you're securing a building that only has 1-2 entrances, then great, you only need 1-2 devices. But in a rural environment, when trying to set up a perimeter of these things in the treeline around your entire house, you often need more like 20-30 devices, which is cost prohibitive. I've also found that when setting these up temporarily (like when stopping somewhere for the night on a patrol) they have a high attrition rate. You're bound to lose some every time you set them up. And when they're expensive, losing and replacing them is cost prohibitive. So what is really needed is a simple perimeter alarm that is as cheap as possible.

Here's where the Nixie Alarm comes in. As of this writing, a single Nixie Alarm costs about $1.28, and a batch of several dozen of them can be assembled in an afternoon out of common components.
OVERVIEW
Now this may closely resemble a mousetrap, and that's because it is one. People (including me) have been futzing around with making tripwire alarms out of mousetraps for a while now, and they've all been pretty janky and unreliable. The missing piece was these:

They're known as "mandarin snaps" or "adult snaps." They're basically a scaled up versions of those little popper fireworks that explode when you toss them on the ground. Like those, these are pressure sensitive, but they're MUCH louder: about the volume of a 22 rifle. When these go off, they can be heard from up to a couple hundred yards away.
So you assemble a big pile of Nixie Alarms, get a few boxes of mandarin snaps, stuff them into your ruck, and head into the field. Once you want to set them up, you simply attach an alarm to a tree/stake/fencepost, hook it up to a basic tripwire, arm it with a mandarin snap, and wait. This process takes a couple minutes, but in 30-60 minutes you can seed a pretty large area with these things. Once in place, they're waterproof and UV resistant (see the testing section, but we've had ones successfully go off a YEAR after being deployed). When you leave the area, simply take them down or leave them in place. It will only be a few dollars lost on your part, and you can make more.
MATERIALS
Required:
1x Victor Mouse Trap. Can be "metal pedal" (M156) or "wide petal" (M325). Currently only $0.66 per if you buy in bulk
2x eyebolts. I use these, but any eyebolt will work so long as it's roughly 3/4" long with a 1/4" eye. $0.05 per pair
1x cotter pin. I use these, but any cotter pin approx. 3/32" diameter and 1 3/4" long will do. $0.07 per
2x Mandarin/Adult Snaps. Use two to ensure reliability. These are only seasonably available in the summer, but they're dirt cheap at that time so you can stock up. Let's say about $0.22 per pair, depending on where you buy them
1x tiny plastic bag, AKA a "dime bag." 2"x2" is a good size. These seem cheapest. About $0.01 per
1x ranger band. Could use rubber bands, but ranger bands are more durable. TBH I've never once bought these, I always get punctured bicycle inner tubes for free from the local bike shop and cut them up into little bands myself.
Floral wire. I've deployed hundreds of these and tried both floral wire, USGI tripwire, and fishing line. Trust me, floral wire is the best bang for your buck. 22 thru 26 gauge all work fine. Get green, brown, or white to match your terrain. The amount used per alarm depends on your deployment, but it costs very little. You go through it very fast so buy several spools worth. I'd guess maybe $0.10 worth of wire per alarm
Optional:
1x split ring, AKA a "keychain ring." Optional, but highly recommended. These seem cheapest right now. You want about 1" diameter rings. $0.05 per
Camouflage spray paint. I personally like the Rustoleum Camouflage line, but you can use whatever. Again, optional but highly recommended. One can can easily paint 100 or more traps, so let's say $0.07 per unit for paint
Olive drab & orange duct tape. This is only necessary if you care about easily recovering the alarms after they've been set off. Cost per unit is approx. $0.05
Tools:
Needle nose pliers with wire cutter. Use these during assembly, and also keep some in your alarm kit for cutting tripwire
Power drill with a drill bit sized slightly smaller than the diameter of your eyebolts, for drilling pilot holes. Optional, since most of the time the necessary holes already exist on the mousetrap
ASSEMBLY
Take your standard mousetrap, and use a pair of pliers to pull off the trigger plate, trigger plate staple, and the tiny staple that holds down the tip of the trigger arm

Take two eyebolts, and screw them into the two holes left by the trigger plate staple. The fastest way I've found is to hold an eyebolt stationary in a pair of pliers, and rotate the mousetrap onto it. The eyebolts don't need to be perfectly straight, but bend them slightly if need be.

OPTIONAL: Slip your split ring onto your cotter pin.

Fold back the kill bar and fold the trigger arm over it, as if setting a normal mousetrap. The tip of the trigger arm should lie between your two eyebolts.

From either side, slide your pin through both eyebolts and over the tip of the trigger arm, so that it holds it down and keeps the trap set. You may need to back your eyebolts out slightly or bend them a bit until everything fits in place. The mechanism of the alarm is now set, it just needs a charge to go off.

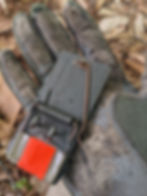
Pull out the pin and disarm the mechanism so it doesn't snap your finger. Stretch a ranger band around the body of the mousetrap with the eyebolts, roughly 1/4" from the edge.

Take two mandarin snaps and carefully place them inside of a plastic bag as shown. Press the air out of the bag with your finger, then seal it. This is your "charge." These are pressure sensitive, so keep them someplace padded and treat them lightly.

OPTIONAL: remove the ranger band, spray paint the front and back of your trap with camouflage paint, and replace the ranger band.

OPTIONAL: cut a roughly 3.5" piece of olive drab duct tape. Split it lengthwise to get a thin strip. Wrap it around the kill bar as shown. On the side that faces up when the trap is not armed, place a small square of orange duct tape. This will A): make it easier to tell if a trap is armed, and B): aid in finding and recovering traps that have been set off.

DEPLOYMENT
Identify a likely route of enemy approach and find two solid anchor points (trees, fenceposts, etc) it must pass between, ideally no more than ~10 feet apart. You may have to create your own anchor points by cutting some rough wooden stakes and sticking them in the ground.

Cut a length of floral wire long enough to wrap around one of your anchor points, and run it through the two staples that hold the kill bar on your alarm. This step can be done at home in advance for faster deployment.
Place the alarm at about calf height on the side of your anchor point where it won't be seen by the approaching enemy, and secure it by wrapping your attached floral wire around the anchor point like a giant twist tie. Tight as possible, but doesn't need to be perfect.

Take out your spool of floral wire, and secure the loose end around the other anchor point like a twist tie. Unravel it back towards your alarm, and cut it to a length allows it to reach a couple feet PAST the alarm. You'll need this extra length in the next step.
Loop a pin onto the end of your tripwire, and twist it like a twist tie to secure it to the wire. The tripwire should be just long enough so that when the pin is inserted into the alarm, the tripwire is loosely hanging a foot or two above the ground. You don't want your tripwire too taught, because it is easier to spot and more likely to be set off accidentally.

Arm your alarm by folding back the kill bar, folding the trigger arm over it, and securing it with the pin attached to your tripwire. Now it is armed, and if someone pulls the tripwire it will snap shut. Test it once or twice to ensure it works smoothly.

Double check your tripwire. Pack up any equipment you're taking with you, cover any tracks/disturbances you made around the alarm, and carefully cover any obvious parts of your handiwork with leaves or branches to conceal it.

Lastly, carefully take a charge and slip it under the ranger band as shown. Allowing your charge to slightly stick out past the edge of the alarm will ensure reliable ignition when the kill bar snaps down onto it. Placing the charge is the very last step you perform, because it minimizes the chance of accidentally setting it off, wasting a charge and making a loud noise.

Done!


You could write an entire book on the tactics and methodology of employing these things, but I'll leave that for others to explain, or for you to find out through experimentation. But my key advice is this: they're small, cheap, and relatively easy to set up, so you might as well put down a lot of them, to ensure good coverage.
Do what you will with this information, I hope it proves useful to you. As always, if you have any questions, feel free to email me at support@nixieworks.com . Thanks!